Build Your First Sprunki Mix: From Two Sounds to Three
A clear arrangement begins with a sound you can recognize. This walkthrough uses Oren’s kick, Pinki’s choir-like vocal, and one optional melody in the main Sprunki player. The aim is to hear what each part contributes before deciding whether the next addition improves the mix.
Find a clean starting point
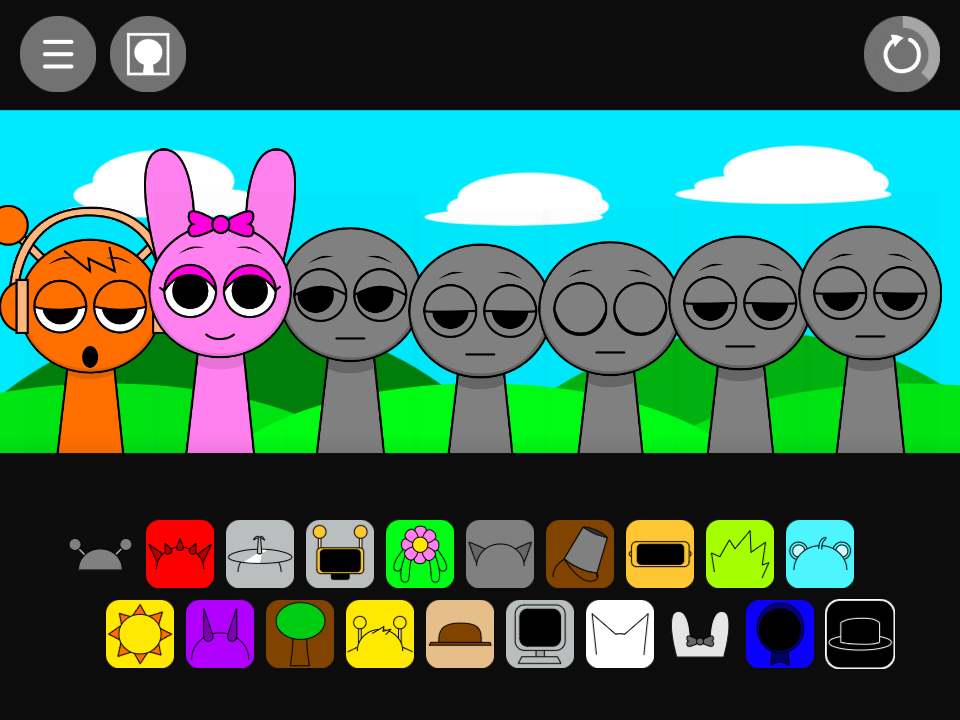
Open the main player and select Play Now. The normal stage has seven gray performer positions with two rows of sound icons underneath. The orange headphone icon begins the upper row; Pinki’s bow appears near the right side of the lower row. If the stage already has sounds assigned, use the reset arrow at its top right.
Start with a comfortable volume and keep another music or video tab paused. You want to judge the game’s own sound, so a second source can make the comparison misleading. If the player loads silently, interact with it once before deciding a particular sound is missing. A voice phrase can also have gaps, so give a new part time to repeat.
Make the two-part arrangement
Oren provides the normal kick family. Pinki provides a choir-family voice. These are useful first choices because a low drum attack and a pitched vocal are easier to distinguish than several similar percussion parts. Their contrasting headphone and bow silhouettes also make the stage easy to read.
The screenshot records this exact pair on the first two positions. You can use those positions to track the parts while you learn; the important decision is which icons are active. Five unfilled positions leave the arrangement uncluttered and give you room for the next comparison.
- Drag Oren’s upper-left headphone icon onto the first gray performer.
- Hear the kick repeat before choosing anything else.
- Drag Pinki’s lower-row bow icon onto the next performer.
- Listen through the vocal phrase, then remove and return Pinki to compare the pair with the drum alone.
Choose the job of a third sound
Before adding a third icon, decide what is missing. If you want another rhythmic accent, compare Raddy’s snare with the existing kick. If you want a lead, try Durple’s horn or Tunner’s whistle. If you want a lower pitched foundation, compare Gray’s bass. Each choice answers a different musical question.
Add only one candidate, hear its phrase, then remove it. Keep Oren and Pinki unchanged during this test. A different third part is easier to evaluate against a constant pair than against an arrangement where the drums and vocal change as well. Write down the three icon shapes if you want to rebuild your preferred result later.
Listen for overlap instead of counting performers
A fuller stage gives more visual activity, but extra parts can cover the sound you meant to feature. Gray and Oren both contribute to the lower area in different ways. Sky, Tunner, and Clukr can draw attention toward higher details. Two simultaneous voices can make the individual phrases harder to follow. These are useful comparisons to make before selecting a fourth or fifth sound.
Try a subtraction pass: hear the arrangement, remove the newest part, and compare again. Keep it when its absence leaves a gap you want filled. Leave it out when the vocal or lead becomes clearer. This exercise works without a score or a prescribed winning combination, because the result is the sound you choose to keep.
Make one alternate version of your mix
Once you recognize the three parts, keep two and replace the third. Swap Pinki for Wenda to compare a shorter vocal figure with the choir-like phrase. Keep the voice and replace the kick with Fun Bot to compare a busier drum foundation. Give the new arrangement a complete repeat before deciding between the versions.
Use separate runs when you want to test the black top-hat transition. That control changes this build’s presentation, so first note the normal arrangement you are comparing. A small set of clearly named choices is more useful for returning to a mix than a screenshot of a full stage whose sound assignments you no longer remember.